
How to pan for fine gold:
Lifetime Warranty.
Our lifetime warranty is granted to the original purchaser of the FlowPan.
It covers any manufacturing defect that arises under normal use.
It does not cover damage resulting from abuse or accident.
WARNING: Our FLOWPAN™ is made of metal and if care is not used you could get cut. Over time rocks and gravels hitting the edges often cause then to become “sharp” and they should be sanded with fine sandpaper from time to time. The HANDLES do have rubber edging, but there are open metal edges exposed.
SEND US YOUR PHOTOS AND REVIEWS
Win some gold, send us your pics and reviews. We’ll pick two winners each month. Use this page to submit. SUBMIT REVIEW
Proper USE…
IMPORTANT NOTE –
DON’T overload the pan. The FLOWPAN is large and the URGE is to LOAD IT UP with dirt and pay. Always start with a SMALL amount of pay to insure you don’t have losses. Doc said this is the only problem he sees with the pan. It’s very big and very fast. But people need to resist the urge to OVERLOAD it.
Pay / Dirt needs to STRATIFY for gold to settle to the bottom. Overloading ANY gold pan will not allow this to happen. All the dirt in the pan needs to wet and loose and moving around easily in the pan so the gold will FALL… / settle / stratify to the bottom.
Start off by putting only a SMALL amount, maybe a quart, of material in the pan while you learn to use it.
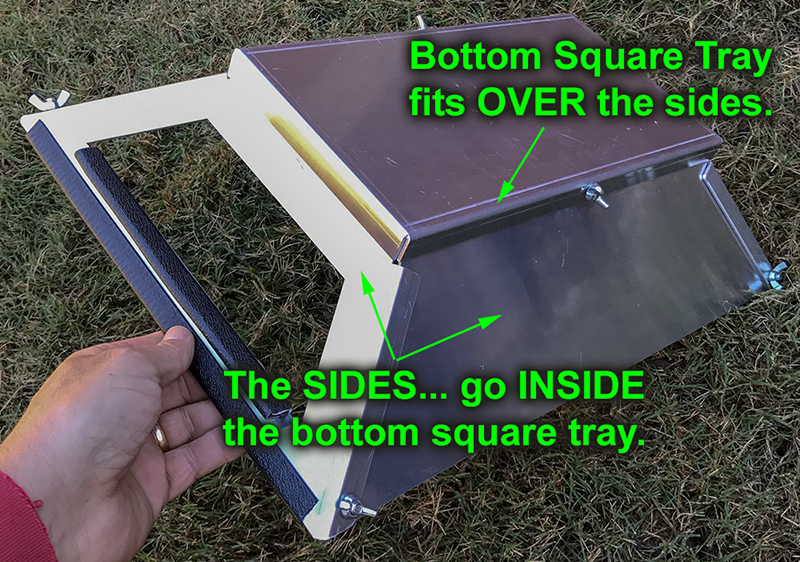
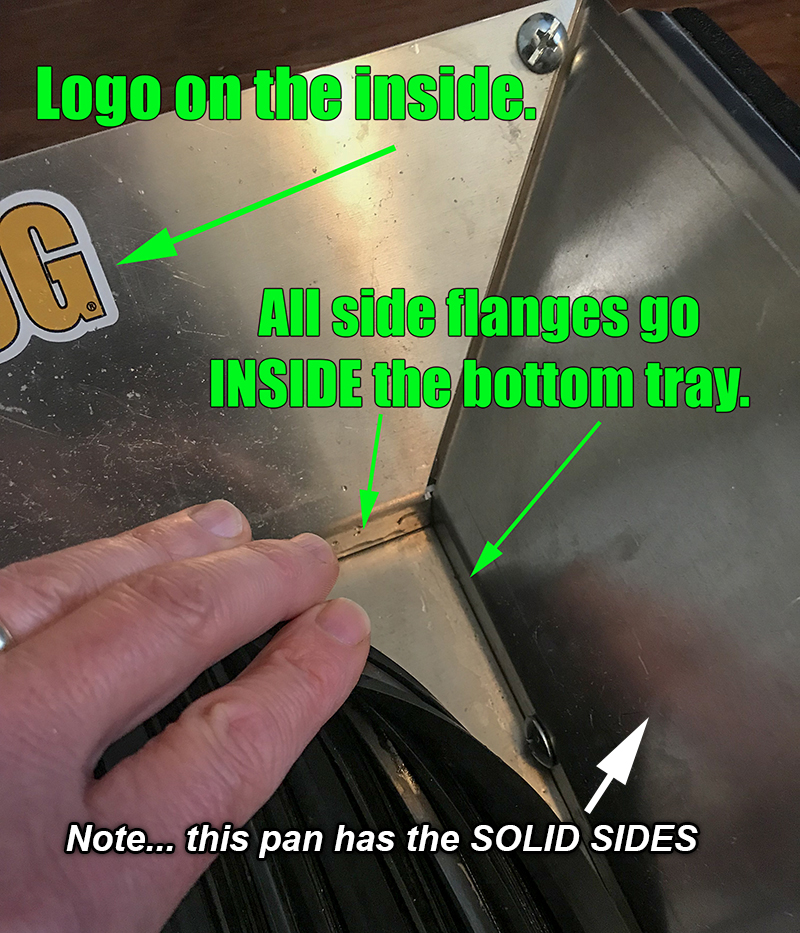
♦ NOTE – The side panels fit INSIDE the bottom square tray.
NOTE – Mat Fit
This was a LONG debate at the shop. How should the mat fit? We decided in the end that the mat should fit pretty tight. This insures that it will not lift at all when working material. So… you will have to press the mat in firmly to the bottom. Next it can be a little hard to remove for some. (You get used to it.) But you can attach a ZIP TIE to one corner if you wish and pull it out using it.
If you want to TIGHTEN the fit… simply add SIDE TAPE like we do on our mats.
THE MAT WILL BE SHORT... this is intentional. Leave about 1/4″ gap between the ends of the pan and the mat. Or… leave the full 1/2″ gap on the EXIT side of the pan. These act like a nugget trap / drop zone.
NOTE – It’s a good idea to clean your mat after each BUCKET of pay. It takes 10 seconds and I think it’s a good rule to follow, even though I often push it beyond that. We have run TEN buckets of pay straight and not had any losses but if you have lots of super fine gold… I would not push it this far.
NOTE – We include a small black strip of rubber. Place it on the pan as shown the video so you know which way the flow should go. The movable tab we include helps you remember where the TOP of the mat is and which way the flow will go.

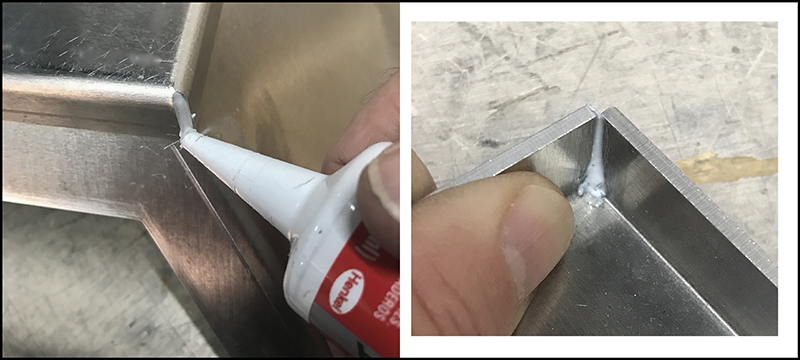
NOTE – Small gaps in the bottom tray.
During our testing we found NO LOSSES with these very small gaps in the bottom corners of the square tray. Silt and sands fill them up quickly. But, prospectors are worried about losing a single speck. So on orders placed as of 1/10/18 , we will start to add a touch of silicone sealant to these corners. If you ordered before that date just add a touch yourself. (below)
NOTE – SAND your edges. Use 180 or 200 grit sand paper and sand the edges from time to time. Rocks and gravels hitting these edges will cause them to become sharp over time. Sanding the edges helps protect your hands from cuts.
NOTE – Wet vs. Dry material.
For material to stratify, it needs to be LOOSE AND WET. Stratification (gold falling down into the mat) WILL NOT happen if ALL the material does not get wet and becomes loose. When working DRY material the BOTTOM of your pile takes a while to get wet. So wet material (dug from a creek bed) is easier to work. If working with DRY material it is a good idea to put the pan UNDER WATER… and slowly pour the material in the pan. This allows material to get WET and it’s easier to work.
Note – ANGLE OF THE PAN while working.
You’ll have to spend some time “relearning” panning with this pan. It’s a different feeling. The more and more we use the pan the less ANGLE we use while washing the dirt. So to start off with, keep the pan FLAT… at all times. Doc now really only adds an ANGLE or pitch when very close to the end of the clearing.
Note – Keep extra nuts and bolts with you.
We include one extra bolt and wingnut, but if you don’t have it WITH YOU… in the field it won’t help.
NOTE – If you don’t understand PROPORTIONAL FORCE… watch that video. It applies in a sluice as well as in our pan. IF YOU ARE FOCUS ON FINE GOLD THIS IS IMPORTANT. The amount of force needed to clear out LARGE rocks can also take away fine gold. So if you have lots of fine gold use less FORCE… and remove more rocks via your hands.
NOTE – It’s NOT designed for SANDS. The pan works well on normal bank material and pay. Sands FIGHT with gold and always have a hard time stratifying. Again… it’s NOT designed for sands.
NOTE – The deeper the water the less BENDING you have to do. Try and find a deeper HOLE in the creek to work the pan. It’s just easier on the back.